red 3d cube google draw
Take you ever created a 3D object using JavaScript? Of course, you lot might have washed. But creating 3D with pure JavaScript requires a large amount of lawmaking, and that's where Three.js shows its magic. With Iii.js, you lot tin build 3D environments in your browser with a very low level of complication.
This tutorial is written with the intention of making you lot exposed to the power of Three.js. In this tutorial, I've covered:
- 1. What is Iii.js?
- two. Key Features of Three.js
- three. Browser Compatibility
- 4. Getting Started With Three.js
In "Getting Started with 3.js" section, I've explained how to make a rotating 3D cube with live working lawmaking and demo, so you could sympathize how Three.js actually works. Hopefully, this tutorial volition aid you a lot especially if you're new to 3D globe.
Let'southward start understanding Iii.js!
What is Three.js?
Three.js is an open source and lightweight JavaScript 3D library that allows yous to create and display animated, interactive 3D computer graphics on any compatible web browser without having to rely on proprietary browser plug-ins. While a simple cube in raw WebGL turns out hundreds of lines of Shader and JavaScript code, a 3.js equivalent is simply a part of that.
Iii.js runs in all WebGL supported browsers and enables you create GPU-accelerated 3D animations by making employ of JavaScript as function of a website. With 3.js, yous'll be able to easily create objects, cameras, materials, lights, and much more than. Best of all, you can use Three.js scripts in conjunction with the HTML5 canvas, SVG, CSS3D or WebGL.
Central Features of Three.js
Three.js has the following features:
- Renderers: <canvass>, <svg>, WebGL, CSS3D, DOM, Software; effects: stereo, crosseyed, anaglyph, and more than.
- Scenes: Add together/remove objects at run-fourth dimension; linear and exponential fog.
- Cameras: Orthographic and perspective; controllers: FPS, trackball, path and more.
- Animation: Keyframe and morph.
- Lights: Hemisphere, directional, area, ambient, spot and point lights; shadows: cast and receive.
- Materials: Phong, face, depth, lambert and more than - all with smooth-shading, texture, shininess and more.

- Shaders: Access to full GLSL capabilities: depth pass, lens flare, and comprehensive postal service-processing library.
- Objects: Bones, lines, meshes, sprites, particles, ribbons, and more.
- Geometry: Cylinder, cube, plane, torus, sphere, ring, 3D text and more than; modifiers: extrude, lathe and tube.
- Loaders: Image, JSON, binary, XHR, scene and more.
- Utilities: Full set of time and 3D math functions that includes quaternion, frustum, triangle, matrix, ray and many more.
- Consign/Import: 3D Max, CTM, Blender, OBJ, and FBX.
- Examples: 150+ files of coding examples plus textures, models, sounds, fonts, and other back up files.
- Debugging: Three.js Inspector, WebGL Inspector, and Stats.js.
- Support: API documentation, public forum and wiki.
Browser Compatibility
Unfortunately, 3D animations are not supported by all browsers. Currently, nosotros're restricted to Google Chrome, Mozilla Firefox, Safari and Opera, while Internet Explorer xi has partial WebGL support. In latest versions of Chrome and Firefox, WebGL support is enabled past default. As fourth dimension goes by, hopefully full back up on Internet Explorer will pick up in future.
In my experience, Chrome is the best browser to work with because its underlying JavaScript engine is blazingly fast and it supports WebGL, Canvas, and SVG. Firefox is my 2nd selection equally its JavaScript engine is lilliputian slower than Chrome's, but even it's a bang-up browser in terms of which render technologies are supported. In improver, information technology'south getting faster with each new version.
Getting Started With Iii.js
Earlier You Start:
In order to use Three.js, yous need to reference its latest version in your HTML document.
Caput over to the official three.js website. Then, download the latest version of Three.js and include it in your HTML like you would whatever other JS file.
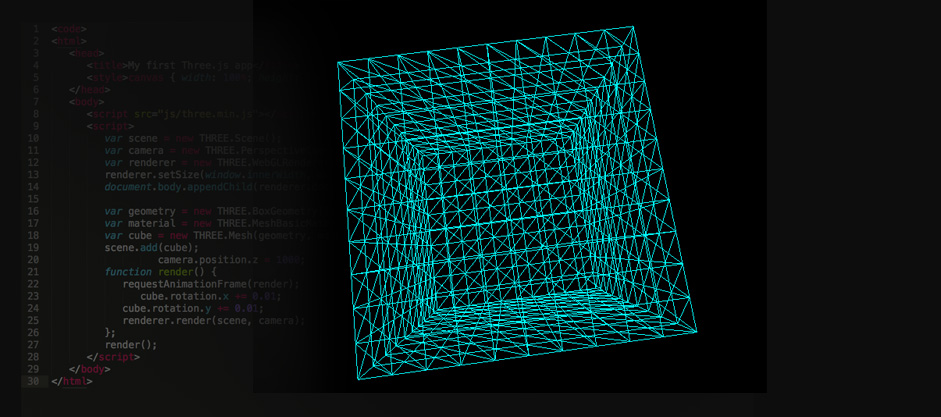
<html> <head> <title>My first Three.js app</title> <style>canvas { width: 100%; height: 100% }</manner> </head> <body> <script src="js/3.min.js"></script> <script> // Our Javascript will go here. </script> </body> </html> That'south all. All the code we're going to create volition go into the empty <script> tag.
Creating the Scene:
To display annihilation with Three.js, you're required to create three things: A scene, a camera and a renderer.
Doing then, y'all'll be able to render the scene with camera. Let's start with a scene:
var scene = new Iii.Scene(); Afterwards setting up the scene, you've to create a camera. Consider information technology as the viewpoint that users are looking from.
var camera = new THREE.PerspectiveCamera(75,window.innerWidth/window.innerHeight, 1,10000); Allow me explicate what's going on here. 3.js has a few dissimilar cameras, just in club to proceed the lawmaking simple, I've used a PerspectiveCamera.
In the above lawmaking, there are iv attributes: the showtime is the vertical field of view (from bottom to superlative) in degrees. The second one is the aspect ratio where the height of the element divides the width. The adjacent is the most clipping aeroplane, and the final is the far clipping plane. The near and far attributes command the rendering of objects. That ways the object that is as well far or too close to the camera won't exist rendered.
After creating the camera, now I'one thousand going to set up the WebGLRenderer. In addition to the WebGLRenderer, Three.js has another renderers - similar CanvasRenderer – which can be used as fallbacks for users whose browsers don't support WebGL for some reason.
var renderer = new THREE.WebGLRenderer(); renderer.setSize(window.innerWidth, window.innerHeight); document.body.appendChild(renderer.domElement); As y'all can encounter, in addition to creating an instance of the renderer, nosotros also accept to set the size at which we want the renderer to display our app. In this instance, I've used the width and height of the browser window. Finally, I've added the renderer element to the HTML folio. This is a <sheet> element used by the renderer to draw the scene.
Creating the 3D Cube:
After setting up the phase, now I'm going to create a 3D cube. For creating a cube, we demand to use the BoxGeometry object that contains all the vertices and faces of the cube.
var geometry = new 3.BoxGeometry(700, 700, 700, 10, ten, 10); This method takes five constructor parameters: the first is the width of the sides of the cube on the Ten axis, the 2nd is elevation of sides of the cube on the Y axis, and the third is the depth of the sides of the cube on Z axis. The final three optional parameters, whose default value is 1, are the number of segmented faces along the width, height, and depth of the sides respectively.
I've gear up upwards the geometry of the cube, now nosotros need to color it using a material. Three.js comes with numerous materials, simply I'one thousand using the MeshBasicMaterial here.
var material = new THREE.MeshBasicMaterial({color: 0xfffff, wireframe: truthful}); For simplicity's sake, I've merely supplied a color attribute of 0xfffff that is blue. I've also set wireframe to true, so you could see the animative cube more clearly. The adjacent thing nosotros need is a Mesh.
var cube = new Three.Mesh(geometry, material); scene.add together(cube); In the in a higher place code, the mesh object takes ii parameters: the start is the geometry and the second is a textile applied to it. Finally, I've added the cube to the scene.
By default, when nosotros telephone call office scene.add(), it adds the cube to the to the coordinates (0,0,0). This causes both the cube and the camera to be inside each other. To avoid this situation, we need to gear up the camera position before rendering the scene.
camera.position.z = 1000; As you lot can come across, whatever code we've written in a higher place is extremely simple, that's because Three.js keeps you away from all the complex stuff.
Rendering the Scene:
If yous paste the higher up code into the HTML file (which I created in the first footstep of this tutorial), and test it in the browser, you'll see nothing. That's because we haven't actually told the scene to render anything yet. To render the scene, we need a return loop.
function return() { requestAnimationFrame(render); renderer.render(scene, camera); } render(); This code creates a loop that instructs the renderer to depict the scene. Hither, you may get confused why didn't I just use setInterval? That's because using requestAnimationFrame instead of setInterval is beneficial in many ways. Most chiefly, it pauses when a user moves to some other tab in the browser, hence saving their precious resources.
Animating the Cube:
If you test the file in your browser, now you'll see a blue box without whatsoever animation. Let'south arrive more exciting by rotating it. Just add the post-obit right below the requestAnimationFrame(render) in the render function. This will run every frame and add together a nice rotation blitheness to the cube.
cube.rotation.x += 0.01; cube.rotation.y += 0.01; The Event:
Congratulations! You lot have successfully built your first Three.js app. Here is the full code:
<html> <head> <title>My offset Three.js app</title> <mode>canvas { width: 100%; superlative: 100% }</style> </caput> <trunk> <script src="js/3.min.js"></script> <script> var scene = new THREE.Scene(); var camera = new THREE.PerspectiveCamera(75, window.innerWidth/window.innerHeight, 1, 10000); var renderer = new Three.WebGLRenderer(); renderer.setSize(window.innerWidth, window.innerHeight); certificate.body.appendChild(renderer.domElement); var geometry = new THREE.BoxGeometry(700, 700, 700, ten, 10, 10); var textile = new THREE.MeshBasicMaterial({color: 0xfffff, wireframe: truthful}); var cube = new Iii.Mesh(geometry, material); scene.add(cube); photographic camera.position.z = chiliad; function render() { requestAnimationFrame(render); cube.rotation.x += 0.01; cube.rotation.y += 0.01; renderer.return(scene, photographic camera); }; render(); </script> </torso> </html> Decision:
Now yous tin meet a properly animating 3D cube in your browser. Watch the live demo of above code. You can play around with information technology to better understand how it works.
As you tin see, this amazing JavaScript library doesn't crave y'all to be a highly-skilled JS developer. Anyone who has the basic working knowledge JavaScript can get started with it in minutes.
Enjoyed this post? Share your cognition with these questions:
Have yous created any 3D object using Three.js?
Practice y'all know any other JavaScript 3D Library?
What you lot call back about the future of Three.js?
Source: https://www.awwwards.com/creating-3d-cube-a-practical-guide-to-three-js-with-live-demo.html
0 Response to "red 3d cube google draw"
Post a Comment